How to Make a Transforming Ninja Star (8-Pointed) Step 1: Folding in Half Diagonally. 2 More Images. With one of the eight squares, fold it in half by folding the upper left corner to the bottom right ... Step 2: Folding in Half Diagonally the Other Way. Step 3: Folding in Half. Step 4: Fold the ...

How to make a ninja star out of money?
Instructions
- Lay the dollar bill horizontally in front of you.
- Fold the bill in half lengthwise and crease, then unfold it again so the crease shows in the center.
- Fold the top edge of the dollar bill lengthwise down to meet the crease in the center. ...
- Fold the bottom edge of the dollar bill up to meet the crease. ...
How to make an easy Ninja Star?
The Easiest Way to Make a Paper Ninja Star
- The First Folds. You should start out with a peice of paper free of any rips or tears, the size doesnt matter, but a standard piece of 8.5 ...
- Making the Cuts. There are a few cuts/tears you will need to make. ...
- The Rocket Ship. ...
- Making the Sssssnake. ...
- Germany. ...
- Finishing Up. ...
- Afterword. ...
How do you make a Ninga star?
Make sure to comment if you have any questions, feedback, requests, or anything else! Also, show some support by liking and sharing the videos—it greatly helps the channel out. Don't forget to SUBSCRIBE and hit the Notification Bell if you enjoy my videos and want to receive all updates from my channel.
How to make a double ninja star?
How to Make a Double Ninja Star Shuriken Origami
- Get Two Sheets of 8.5 X 11 Paper.
- Put the Paper in a Landscape Position and Fold It in Half Sideways
- Unfold the Paper Back and Cut It in Half Along the Crease
- Take One Piece of Paper That You Just Cut. ...
- Unfold the Paper Back Again. ...
- Repeat All the Steps for the Other 8.5 X 11 Paper
- Take Two Pieces and Put Them in a Landscape Position. ...
How do you make a Transforming Ninja Star step by step?
4:1513:29How to Make a Transforming Ninja Star! (8-Pointed) - YouTubeYouTubeStart of suggested clipEnd of suggested clipI like to cut this sticky edge in half by holding it vertically on the back like this. Then you foldMoreI like to cut this sticky edge in half by holding it vertically on the back like this. Then you fold the top edge down to the bottom edge and I'll show you why I do that.
How do you make a 4 point Transforming Ninja Star?
How to Make a 4-Pointed Transforming Ninja StarStep 1: With One of the Four Squares, Fold It in Half by Folding the Top to the Bottom, Then Unfold. ... Step 2: Fold the Right Top Corner to Meet the Middle Fold. ... Step 3: Fold the Left Top Corner to Meet the Middle Fold.More items...
How do you make a double ninja star?
4:5311:29How to Make a Double Ninja Star (DIST-8) - Origami - YouTubeYouTubeStart of suggested clipEnd of suggested clipEnd fold the paper in half like. This. Make a crease. Open it right side goes down on to thatMoreEnd fold the paper in half like. This. Make a crease. Open it right side goes down on to that midline. Left side goes up flip it over top goes down the bottom goes up.
How do you make a ninja star for kids?
0:4210:07How To Make A Paper Ninja Star - YouTubeYouTubeStart of suggested clipEnd of suggested clipAnd start with the white side up and then we're going to fold it in half. So you want to match upMoreAnd start with the white side up and then we're going to fold it in half. So you want to match up the lines. And the nice thing about origami paper is that it starts square.
How do you make a 3d transforming ninja star?
0:2623:223-D Super Transforming Ninja Star - YouTubeYouTubeStart of suggested clipEnd of suggested clipSo for this mall I'm going to use eight sheets of Qaumi for the star. And then one more sheet ofMoreSo for this mall I'm going to use eight sheets of Qaumi for the star. And then one more sheet of Qaumi. Makes a stencil to make sure we fold all eight units the same.
How do you make a boomerang ninja star?
8:4612:08Amazing Ninja Tri-Star Boomerang! (Flies Back) - YouTubeYouTubeStart of suggested clipEnd of suggested clipOpen it twist it clockwise push. Down on the bottom edge. And make sure that these two edges stayMoreOpen it twist it clockwise push. Down on the bottom edge. And make sure that these two edges stay together press down until it goes all the way to the middle.
How do you make a boomerang transform?
2:509:14Four Pointed Transforming Ninja Star Boomerang - YouTubeYouTubeStart of suggested clipEnd of suggested clipSo pull on this crease and fold on this crease. And pinch the corner. So that it sticks up and nowMoreSo pull on this crease and fold on this crease. And pinch the corner. So that it sticks up and now bring the two flaps together and we're going to push this flap in so push.
How do you make a sticky note shuriken?
Fold the bottom edge to the tip of the point you just created. Fold in half vertically so that it looks like a square made of two triangles. Pull the shared upper left corner of the triangles apart from itself until you get a rhombus shape and crease. Repeat the previous steps seven times with different sticky notes.
How do you make a long ninja star?
Cool Uncle Tricks: How to Make a Ninja Star Out of PaperStep 1: Fold Sheets in Half (Twice) ... Step 2: Fold in Half the Long Way. ... Step 3: Fold Up, Fold Down. ... Step 4: Fold Down, Fold Up. ... Step 6: Fold Corners. ... Step 7: Fold Corners in Again. ... Step 8: Overlap Pieces. ... Step 9: Flip and Finish.
How do you make a Kunai knife?
StepsGet two square pieces of paper, preferably black construction paper. ... Holding the smaller square, fold one corner to the opposite side. ... Fold a crease halfway through the paper. ... Unfold the paper. ... Take one of the short sides of the triangle (not the long one) and fold the edge to the middle.More items...
How do you make a ninja star out of one piece of paper?
7:048:20How to Make a Paper Ninja Star (Shuriken) - Origami - YouTubeYouTubeStart of suggested clipEnd of suggested clipDown first and you'd like to put this one over it so we're going to go in a clockwise direction. SoMoreDown first and you'd like to put this one over it so we're going to go in a clockwise direction. So this one should be all the way in the middle on the bottom. So one then you do this one.
How do you make an origami Fox Kids art hub?
0:044:31How To Fold An Easy Origami Fox - YouTubeYouTubeStart of suggested clipEnd of suggested clipJust like this and we want to make sure that the corners line up then we're going to hold it downMoreJust like this and we want to make sure that the corners line up then we're going to hold it down right here start right down the middle come down the middle use both fingers.
Step 1
Fold one sticky note in half with the sticky parts on the inside. So far this whole thing is pretty easy, right? It’s just a basic rectangle — something you can call out to your students if you’re working on shapes.
Step 2
Next, you’re going to want to fold the bottom left corner up at a right angle. This will create a triangle shape (again, if you’re working on shapes, origami is a great way to get your students engaged!).
Step 3
Unfold the sticky note all the way and fold the two top corners down to the middle crease, like the image below.
Step 5
Using the creases you made in step 2, fold the bottom in towards the middle to create a parallelogram. This is a little tricky, but the photos should help …
Step 6
Repeat steps 1-5 using the other sticky notes. In the end, you should have four of each color!
Step 9
Repeat the process, alternating colors, until you get to the last piece!
Step 10
The last piece goes in the same way, except you need to make sure the end opening part of the last piece is sitting either side of the first piece you started with! Make sure all the little excess bits have been tucked in!
Step 1: Folding in Half Diagonally
With one of the eight squares, fold it in half by folding the upper left corner to the bottom right corner, then unfold.
Step 3: Folding in Half
Fold the top half backwards, then unfold. Poke the center with your finger so that it pops in.
Step 6: Inverting the Right Crease
Fold the upper half to the lower half while inverting the right crease to the center.
Step 1: Start 2
With one of the four squares, fold it in half by folding the upper left corner to the bottom right corner, then unfold.
Step 3: Start 4
Fold the top half backwards, then unfold. And Poke the center with your finger so that it pops in.
Step 4: Start 5
Fold the upper left corner to the center, but don't fold pass the center divider.
Step 6: Start 7
Fold the upper half to the lower half while inverting the right crease to the center.
Step 8: Start 9
Put one blade between the double flaps of another blade. Just like in the picture, the black blade is placed between the flaps of the grey blade.
Step 9: Start 10
Fold in the flaps of the left (grey) blade to lock the right (black) blade into place. Then pull down the right blade so it locks at the end. And Add another blade to the flaps of the right one and also lock that into place
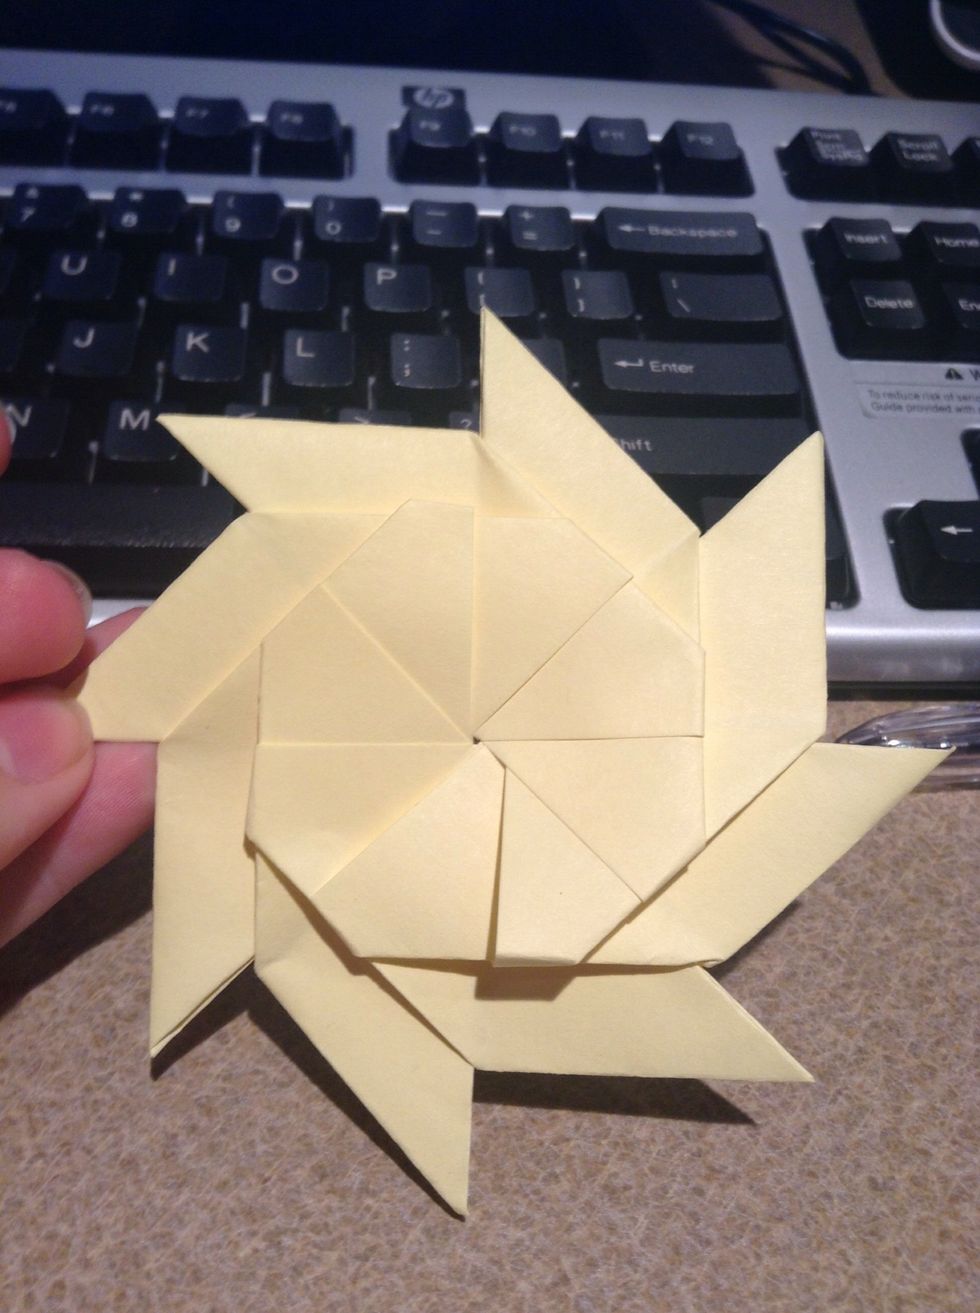
Step 10: Start 11
Keep adding and locking blades untill all 8 blades are used. And Lock the last to the first blade and you have yourself a frisbee. When locking the last blade, make sure to only lock the sides of the first blade and not accidentally lock the second blade also.